We have written about how browser extensions can be useful for us, and how does their architecture look like inside. These are required for gathering the start before we enter the topic of how to build an extension. In this article we will show you how to create a simple Google Chrome Extension which will, after having its icon clicked in the top right part of the browser, inject CSS into the current page and invert all of the colors inside it.
First, create a folder in your wanted location locally and inside it these files:
- manifest.json
- content.js
- background.js
Although not required, you can also find a small photo that you want to use for your extension icon. Create an “img” folder next to the manifest and add it inside as “icon.png”.
Second, populate your manifest:
Example template:
{
  "manifest_version": 3,
  "name": "Test Extension Name",
  "description": "Test Extension Description.",
  "version": "1.0.0",
  "icons": {
    "16": "img/icon.png",
    "48": "img/icon.png",
    "128": "img/icon.png"
  },
  "action": {
    "default_icon": "img/icon.png",
    "default_title": "Test Extension Name"
  },
  "content_scripts": [
    {
      "matches": [
        "<all_urls>"
      ],
      "js": [
        "content.js"
      ]
    }
  ],
  "background": {
    "service_worker": "background.js"
  },
  "permissions": [
    "activeTab"
  ]
}
Here you can change some of the basics such as the name, description, and the tooltip hover over the icon which is the “default_title” variable.
The icon size will be auto-adjusted by Chrome so you also don’t need to resize it yourself as well.
Third, load the extension into the browser:
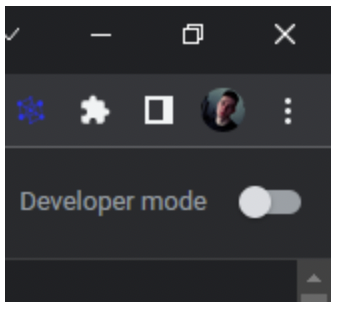
- Go to
chrome://extensions/by pasting it as a URL into the browser. - Flip on the switch in the top right corner to turn on your developer settings:
- Click on the “Load unpacked” button in the top left corner:
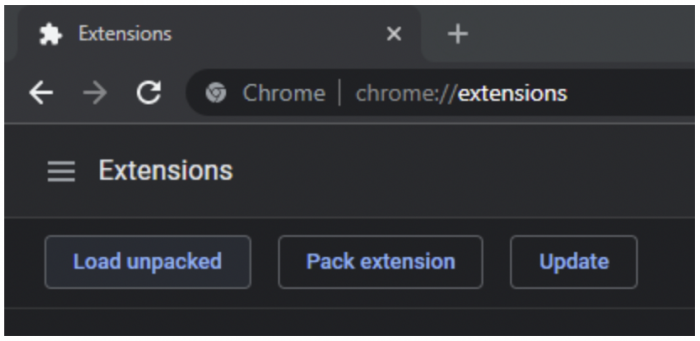
- Find and submit the folder where you saved all your extension files.
Now you should see your extension already up and available inside your browser both at the chrome://extensions/ page and at the top right corner where your other extensions are:

Now that we have all the environments set up, let’s start by editing our:
Content.js
Code inside will be executed at every site URL that matches our array of strings we placed inside our manifest.json, in our case we want our content script to execute on every single page so we used a special variable above <all_urls>.
You can look at all possible match patterns for your specific use cases at the official documentation.
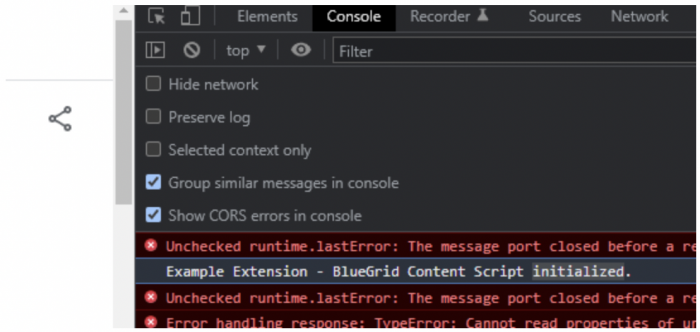
You can place a simple console.log inside your content.js at the beginning in order to be able to see if your content script is present at the domains that you want them to be:
console.log("Content Script initialized.");Now, after every single change you make on your extension that you want to see, you will always have to go to chrome://extensions/, find your extension and click on the reload button for Chrome to load your new files with the new code changes:

You will also have to reload the page you are testing your content scripts at in case you are doing so later on.
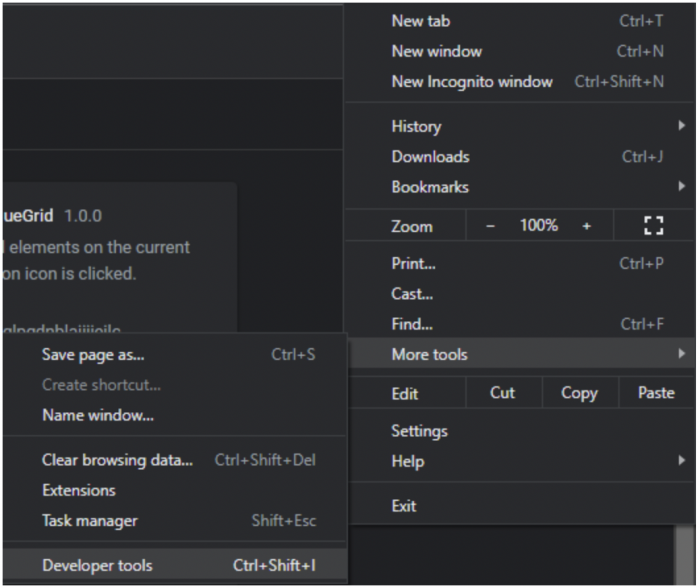
The next step is now going to any regular web page (you can’t run content scripts on chrome://extensions) and open the Chrome Developer Console.
You can do that by pressing CTRL + SHIFT + J, or through the UI at:
And here we see our message:
Now, let’s create a basic listener through the chrome.runtime.onMessage a function which will receive any messages that are sent to our content script later on from the background.js so we can log it.
Our content.js should now look like this:
console.log("Example Extension - BlueGrid Content Script initialized.");

// Listen for messages from the background.js
chrome.runtime.onMessage.addListener(function (msg, sender, sendResponse) {
    if (msg.text === 'invertColors') {

        console.log("Message received!")

    }
});
Save it and then let’s move on to the background.js.
Open backgorund.js and create a simple listener with the chrome.action.onClicked a function that will listen to and respond to the icon of the extension inside the top right corner of the screen is clicked:
chrome.action.onClicked.addListener(function (tab) {
    chrome.tabs.sendMessage(
        tab.id,
        { text: 'invertColors' }
    );
});
After saving that we can test out our extension by reloading it and then also reloading the tabs it is executed inside of again before clicking the icon:

Great! We know that the communication between the two scripts now works, so we will move on to adding the finishing touch of our extension, the main logic that will be used for inverting all of the colors on the page.
We will be using the document.createElement in order to create a simple “style” HTML element in which we will input the required CSS that will change the entire page, and then append it to the “head” element at the end.
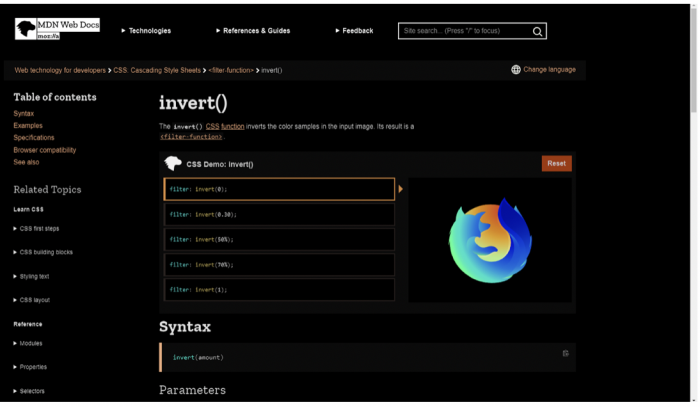
The specific CSS function we will use to do the actual inversion of colors here is going to be invert(), which you can check out in more detail at the MDN documentation.
At the end, our content.js will look like this:
console.log("Example Extension - BlueGrid Content Script initialized.");

// Listen for messages from the background.js
let currentlyEnabled = false;
chrome.runtime.onMessage.addListener(function (msg, sender, sendResponse) {
    if (msg.text === 'invertColors') {

        // Prepare the required CSS for inversion
        let css = "";
        if (currentlyEnabled) {
            css = 'html {-webkit-filter: invert(0%);' +
                '-moz-filter: invert(0%);' +
                '-o-filter: invert(0%);' +
                '-ms-filter: invert(0%); }'
            currentlyEnabled = false;
        } else {
            css = 'html {-webkit-filter: invert(100%);' +
                '-moz-filter: invert(100%);' +
                '-o-filter: invert(100%);' +
                '-ms-filter: invert(100%); }';
            currentlyEnabled = true;
        }

        // Create and append the style element onto the web page
        let style = document.createElement('style');
        style.appendChild(document.createTextNode(css));
        document.getElementsByTagName('head')[0].appendChild(style);

    }
});
After reloading our extension for the final time and going to a regular web page, we can click the extension icon in the top right to finally see it working fully, and invert the colors of all the page elements with each click, giving us a simplified dark mode version of any website:
Before:

After:
Voila! As promised, simple extension and demonstration of its functionality. Let us know if you want to see more or if you want to contribute to the community.


